How To Remove Background Noise In Fl Studio
FL STUDIO BASICS
Find what mixer channel the noise is coming from, and then find what plugin is generating the noise. Its probably a demo plugin that disperses white noise to encourage people to buy it (in order to disable the white noise). If you have a microphone connected it could also contribute to the noise floor. WAVE EDITOR / RECORDER Noise Removal Tool The Noise Removal Tool can independently remove background noise (tonal or broadband) from a sample, repair clipped samples and remove clicks from samples. Any or all these denoise functions can be performed in a single pass. The modules are activated by the button in front of each section label.
This section covers the FL Studio desktop and basic workflow. FL Studio allows you to load instruments and samples, play these live or manually enter the note data, record external sounds (from a microphone for example) and play the whole mix back through the mixer (adding effects). The completed project can be saved to a .flp or .zip and/or exported (rendered) to .wav, .mp3 or .ogg audio.
This section covers:
- The main windows.
- Adding instruments to a project.
- Composing & sequencing.
- Arranging & editing songs.
- Mixing & levels.
- Exporting audio & saving.
After the above, we also recommend you watch the FL Studio Getting Started YouTube playlist.
Main Windows
The FL Studio desktop is based on a number of windows, most of these are movable (with overlap), resizable, zoomable and switchable so if a window isn't visible open it using the Shortcut toolbar (or the function keys as noted in brackets). The main windows involved in FL Studio music creation are -Channel Rack (F6),Piano roll (F7).Mixer (F9) andPlaylist (F5).The Browser (Alt+F8) is used to access audio files, plugins & presets (see the File setting options for adding folders elsewhere on your computer to the Browser). NOTE: If you ever need to reset the position of all windows to their default use (Ctrl+Shift+H) or see the View menu options.
Workflow
Once you have mastered the FL Studio interface, the next step is to learn the procedure for creating music - the FL Studio 'workflow'. The typical steps making a track are outlined below:
1. Instruments
The Channel Rack holds instruments (plugins) that create sound and internal generators that control automation. Every pattern has access to all instruments in the rack. So, all patterns have access to all instruments in the Channel Rack. Patterns are not limited to a single instrument as they are in most other sequencers. Music data can come in the form of Step sequences and Piano roll scores. The height of the Channel Rack will change dynamically as you add and remove plugins. The Step Sequencer, ( Video Here) is a pattern-based grid sequencer ideal for creating drum loops when Channels are loaded with the native Sampler, that holds a single percussion sample per Channel.
- Instruments - Instrument plugins make the sounds used in a song and are loaded in the Channel Rack. In thescreen-shot above, the instrument interfaces are minimized and can be accessed by Left-clicking on the Channel buttons. Instruments generally fall into two types, software synthesizers that create audio using an internal 'synthesis engine' or sample players that play back 'audio recordings' such as drum loops, percussion samples or instrument samples.
- There are several ways to load a new instrument, the first two below will auto-name and auto-route the instrument to the Mixer track:
- Load plugins from the plugin picker - Open the Plugin Picker (F8) then drag-and-drop a plugin on the desired Playlist Track header (the area at the start of the Playlist lane). The Playlist Track and first empty Mixer track will be auto-named and plugin routed to that Mixer track. You can also double-click an instrument plugin in the Picker OR drag it to the Channel Rack and the instrument will be routed to the Master Mixer track.
- Load plugins from the Browser - Drag a plugin preset or samples/loops from the Browser to a Mixer track. The Mixer track will be auto-named and plugin routed to that Mixer track. You can also drop it on the Channel Rack and the instrument will be routed to the Master Mixer track.
- + - Use the Add channel button at the bottom of the Channel Rack. The instrument will be routed to the Master Mixer track.
- Add menu - Use the Add menu.
- Replace an existing instrument channel - Right-Click on a Channel button and select 'Replace >' from the pop-up context menu.
- In the case of samples & loops you can also drag these from the Browser to the Playlist (see below). When you drag a sample to the Playlist anAudio Clip instrument is automatically added to the Channel window. Alternatively you can Right-Click the sample in the Browser and 'send' it to one of the instruments in the pop-up list.
- Add your own folders to the Browser with the F10 >File settings dialog.
- To open an instrument interface Left-click on the Channel button.
- Think of the Channel window as a rack of synthesizer/sampler modules that can be routed to any one of the 99 Mixer Tracks using the Channel settings FX (Mixer Track Selector).
- There are several ways to load a new instrument, the first two below will auto-name and auto-route the instrument to the Mixer track:
2. Composing & sequencing
- Composing - Musical notes and chords can be played live via a controller keyboard or entered manually in thePiano roll (Right-Click the Channel buttons to open the Piano roll) OR use the default Step Sequencer totrigger percussion samples. There is a Step Recording option on the Shortcut icons too.
- When editing patterns, make sure you are in Pattern Mode so that when you press play the currently selected pattern is played.
- To the right of each instrument button in the Channel window is either a step-sequencer display (rows of squares) or a mini-preview of a Piano roll (green lines).
- Step Sequencers and Piano rolls are interchangeable for each Channel.
- New instruments start with an empty Step Sequencer pattern by default. Step Sequencers and Piano rolls hold the note data onlyfor the instrument channel they are associated with.
- Step-sequencer 'steps' are activated by by Left-clicking the squares to turn them on, or Right-Clicking to turn them off (great for percussion programming).
- To open an existingPiano roll, Left-click directly on the mini-preview window.
Changing patterns - Left-click hold and slide up/down on the Pattern Selector (shown above) to change the pattern number and work on a new pattern.
- Up to 999 unique patterns can be created. The complete stack of channel instruments and their Step sequence/Piano roll data is a single pattern. In the example above,Pattern '1' consists of a Harmor Channel being played by a Piano roll and a Step Sequence Hat Channel.In the example below Pattern 2 consists only of step-sequence data playing the Kick & Hat channels.
- As you step through the patterns with the Pattern Selector, the appearance of the channel window will change to reflect the note dataassociated with each pattern.
- The length of each pattern can vary and is determined by the number of bars spanned by the longest data in any one of the channels.
- Piano rolls may be of any length. The 'LCD' window showing '--' in the top left corner of the Channel window changes the number of Steps in the pattern (4 to 64 are possible).
3. Arranging & editing
The Playlist sequences all the elements of the project that play to make the final song. The Playlist window is a stack of multi-purpose 'Clip Tracks' that can host Patterns Clips, Audio Clips and Automation Clips. Unlike most other sequencers, the Playlist tracks are not bound to any one instrument, audio recording or even Clip type. You can put any Clip type anywhere and even overlay Clips. Think of Clips as a little like notes in the Piano roll. When the play-head reaches a Clip, FL Studio plays whatever the Clip instructs it to do.
- Arranging - A handy tool to use when arranging is the Picker Panel (shown above). Use this to select, or drag and drop, Patterns, Audio and Automation Clips into the Playlist. It's also great for managing content, allowing you to group rename and color Clips.
- Arranging with 'Producer edition' - Use the Playlist to hold three types of data, use the Clip source selector (shown below) to select:
- Pattern Clips (notes) - Patterns generally hold note data for sequencing Plugin instruments, although they can also containAutomation Event data.
- Audio Clips (audio/loops/samples) - If an Audio Clip already exists, it can be selected from the 'Clip source selector', otherwise you can drag sample/loop/audio filesfrom the Browser directly into the Playlist. Add your own folders to the Browser with the F10 >File settings dialog.
- Automation Clips (control movements) - Automation Clips move knobs and controls on the FL Studio interface and plugins.To create an Automation Clip Right-Click on an interface control and select 'Create automation clip'.
- Arranging with 'Fruity Edition' - that only has access to the Pattern Clip type that holds note data from Stepsequences or Piano rolls &Event Automation. The length of a Pattern Clip will be determined by the length of the data in it, you are not restricted.
- Audio - Since Audio Clips are not available in Fruity Edition, to insert track-length audio you can trigger aSampler Channel from a Pattern using the Piano roll to control the duration of the sample. The note C5 will play the audio at the original pitch.
- An alternative Clip selection method is to Right-Click a tab of the Playlist Clip Focus selector to show Clips of the desired category.
- Once a Clip is selected, select Draw (Pencil) or Paint (Brush) mode Left-click on a blank area of the Playlist. Dragging in Paint mode will repeat the Clip as you drag horizontally.
- Once placed, Pattern Clips can be clicked + dragged around (horizontally or vertically) by the name-bar that runs along the top of the clip. The way the clip moves will depend on the Playlistsnap settingsand zoom level.
- The Playlist Clip Tracks can be named, colored, moved up/down or muted. These functions are accessed by Right-Clicking on the Name area at the start of each track.
- You can place any Pattern Clip in any Clip Track, or any number of different clips in the same track. Clip tracks are just universal holding lanes for any and all data types.
- Playback - Make sure you are in Song Mode so that the patterns are played from the Playlist. Otherwise, you will play only the selected pattern. There are Play buttons on thetop of the Channel window and Playlist, so you can also initiate a Pattern or Playlist play-back that way.
- FL Studio is not limited to pattern-based sequencing, you can also enter an unused Pattern Clip into the Playlist and play song-length data (patterns). Thus, FL Studio has the flexibility of beingeither a 'track-based' sequencer, a 'pattern-based' sequencer, or a combination of the two.
- Arranging with 'Producer edition' - Use the Playlist to hold three types of data, use the Clip source selector (shown below) to select:
4. Mixing
The Channel Rack shows a Channel button for each instrument. The audio from each Channel is sent to one of the Mixer Tracks for effects processing and level mixing. Set the destination Mixer track from the selector to the left side of the Channel Button. The same selector is also available from the Instrument Channel Settings under the Channel Settings icon. Playlist Clip Tracks are not bound to Mixer tracks, rather Channel Rack to Mixer routing decides the Mixer track/s that are used. So Instrument Channels are bound to Mixer tracks, not Playlist tracks. For example, a single Pattern Clip on a single Playlist track, could trigger every Channel Rack instrument, and so all Mixer tracks if they were routed accordingly. If you want to simulate 'traditional' sequencer workflow: Route each Instrument to a separate Mixer track. Use one Instrument Channel per Pattern Clip and use one song-length Pattern Clip per Playlist track.
- Mixing - Sound from the instrument channels is routed to the Mixer using the Channel settings Mixer TRACK send (as shown above). Use the Mixer to set levels and add Effects (FX) such as reverberation (reverb), chorus and delay.
- See the page Levels, Mixing & Clipping for more detailed Mixing advice, and in particular the section Making tracks louder! (and good) for some tips on getting a great 'commercial' sound.
- Almost all aspects of mixing are automatable, so fader movements and knob changes become part of the overall performance.
- The Mixer is also the place where external audio from a microphone, guitar or synthesizer can be recordedalong with the internal instruments.
- The recorded sound is displayed in the Playlist as an Audio Clip.
- NOTE:Routing Instrument Channels to Mixer tracks - The most efficient way to route one or more Channels to Mixer tracks is to:
- 1. Left or Right-Click the Channel Selector LED's to the right side of each Instrument Channel you want to route (Right-Clicking allows multiple selections).
- 2. Right-Click the target Mixer track and select 'Link selected channels > to this track' from the pop-up menu. OR use 'Link selected channels > starting from this track' to assignmultiple Channels to multiple Mixer tracks.
5. Exporting audio
- Exporting/Rendering - The final mix is exported from FL Studio to a .wav, .mp3 or .ogg fileformat by selecting the export option from the file menu in a non-real time process called rendering.
- CD? If you want to make an Audio CD you need to render to 16-Bit, 44.1 kHz .wav files. FL Studio does not burn audio CDs so you will needto use a 3rd party Audio CD burning application.
That's it, go make some organized noise!
WAVE EDITOR / RECORDER
The Noise Removal Tool can remove continuous background noises, such as hiss or electrical hum from a sample, repair clipped samples and remove clicks from samples. It's not designed to remove transient background noises such as a door slam or bird song. Any or all these denoise functions can be performed in a single pass. The modules are activated by the button in front of each section label. See a tutorial video here.
NOTE: The Denoiser, Declipper and Declicker have a button preceding the section titles, this activates the given function when selected. Driver for hp scanner windows 10. The Declipper and Declicker are deactivated in the screenshot above.
To Open the Noise Removal Tool
To open the Noise Removal Tool Left-click on the Clean up (denoise) button or use theTools > Spectral > Clean up (denoise) option.
Residual vs Removed Sound
Above the main display window.
- Output noise only - When selected the parts of the sample removed by the Denoiser tool (noise) are heard. Select this button when you need to fine-tune the Denoiser process Threshold andAmount settings (using the Preview function). Listen for settings that sound only like the noise to be removed. If you hear parts of the sound you want to retain in the noise output, then the settingsare too aggressive. When deselected the Preview & Accept buttons will deliver the processed (residual) sound according to the plugin settings.
Sample Display
The main display window shows a spectral view of the sample to be processed. Sprint layout edit macros 2010. This represents frequency on the horizontal axis and time on the vertical axis, while color represents intensity.
- Frequency scale - Zooms the frequency scale for more or less precise EQ curve editing or frequency inspection.
EQ Envelope
The (white) EQ envelope allows a +12 to -24 dB EQ curve to be applied to the selected sample. Time is represented on the vertical axis and Frequency on the horizontal axis.Apply EQ in addition to the other noise reduction functions to fine-tune the result.
To edit the EQ curve: Right-click in the 'Envelope Editor Window' to add points, and Left-click to move points and tension markers. Right-click points to open a context menu thatallows you to delete points or change the curve type. The default mid-line is 'no change'. Boost/Cut values appear in the FL Studio Hint Bar as the nodes are moved.
If you need a dedicated equalizer use the Equalize tool.
- Reset - Resets the EQ envelope to the default state.
- Envelope options (small right facing arrow under the EQ display window).
- Open state file / Save state file - Opens/saves envelope states. Several different pre-defined state files are available.
- Copy state / Paste state - Use this to copy and paste envelopes, usually between instances of the EQ editor across open Edisons.
- Undo - Undoes the last envelope edit.
- Undo history / Last reset - Shows the editing history since the last reset.
- Flip vertically - Inverts the current envelope.
- Scale levels - Opens the Scale Level tool.
- Normalize levels - Scales the envelope so the highest and/or lowest levels reach +/- 100%.
- Decimate points - Opens a simple tool that allows manipulation of the number of control points in the envelope (useful in conjunction with Analyze audio file).
- Filter - Opens the Envelope Filter tool (useful in conjunction with Analyze audio file).
- Smooth up - Opens the Smooth Up tool that allows smoothing of the envelope shape (useful in conjunction with Analyze audio file).
- Smooth up abrupt changes - Quick removal of 'spikey' or sudden changes in the envelope.
- Turn all points smooth - Preset filter to quickly filter the envelope.
- Create sequence - Opens the Envelope Sequencer tool.
- Analyze audio file - Open, analyze and replicate the volume envelope of an input sound file. Drag and drop audio files directly on the Envelope editor for automatic analysis.
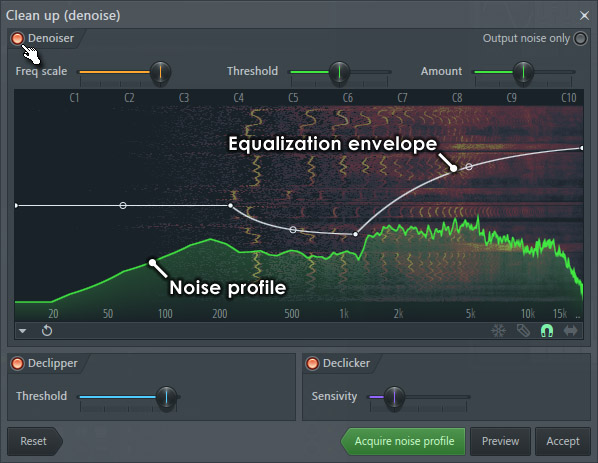
Denoiser
To activate ensure the Denoiser button is selected. The Denoiser is designed to reduce or remove constant background noises in recordings. This background noise can include tape hiss, microphone hum, power mains buzz, camera motor noise, air-conditioning rumble and any other type of noise that doesn't change in level or frequency significantly throughout the recording. If you need to remove door slams, bird song or any similar transient and variable sound. This is not the tool you are looking for.
- Threshold - Controls the separation of noise and desirable signal levels. Higher threshold settings reduce more noise, but also may suppress low-level desirable components of the signal (select the Output noise only switch to hear the sound being removed).A lower threshold preserves low-level signal details, but can result in noise being modulated by the retained sounds. A good default is 0 dB.
- Amount - Controls the level of noise suppression in decibels. Strong suppression can degrade low-level residual audio, so it's recommended to apply only as much suppression as needed to reduce thetarget noise to the level that is barely noticeable (click the Preview button to audition various settings prior to applying the noise reduction). Remember, if the sound is to be used in a mix, then it is likelythat less suppression will be needed to render the noise inaudible.
Using the Denoiser:
- Noise profile - The Denoiser needs to hear an example of the background noise, preferably in isolation from other sounds, so that it can generate an accurate 'noise profile'. From main Edison samplewindow, select a section of the sample that contains only noise (if possible). Examine the start and end of the sample, where noises are usually exposed. Alternatively, you may need to select regions in the samplewhere there are pauses in the desirable sound (breaks in speech or singing for example). If a 'noise-only' region can't be found, select a quiet section of the sample where the noise is at its most audible. After selectingthe longest section of noise that you can find, Right-click the Clean up (denoise) button to create the noise profile. If the Noise Removal Tool is open, click the Acquire noise profile button to select thenoise sample.
- Select the region to be processed - Prior to returning to the Denoiser interface, make sure that the region you want to denoise is selected in the main Edison sample window (the Denoiser will retain thenoise profile so it is OK to close the Denoiser to select the region to be processed). If no region is selected the whole sample will be processed, this is usually the desired outcome as processing small sections of asample can lead to audible tonal changes at the boundaries of the processed region.
- Preview the settings - Open the Denoiser Tool and preview the default settings by clicking on the Preview button. Note the noise profile will appear in the Denoiser as a green frequency curve(see the screenshot above).
- Fine tune the controls - Sometimes you may hear 'underwater' artifacts of the noise reduction process, if so you should continue to adjust first the Threshold and then the Amountsettings. You should apply only enough reduction (Amount) to make the noise barely or not noticeable in the context for which the sound is to be used. Excessive amount settings are guaranteed to cause audibleartifacts. It is often useful to select the Output noise only button to more clearly hear the parts of the sample being removed. Ideally only noise will be heard.
- Accept the result - Once you are satisfied with the settings.
- Practice makes perfect - If you would like to experiment, the sound 'Maximus NoiseGate Tutorial 44kHz.wav' is avocal mixed with some power-supply hum, exposed at the end of the sample. To download the file you will need to create a logon at freesound.The freesound project is an initiative of the Music Technology Group of Pompeu Fabra University to build a library of Creative Commons licensed sounds.
Declipper
To activate ensure the Declipper button is selected. The Declipper can repair digital and analog clipping artifacts that result when A/D converters are overloaded or magnetic tape is over-saturated.The Declipper can be extremely useful for saving recordings that can't be re-recorded such as live concerts, interviews or one-off audio events.
- Threshold - Selects the clipping level used for detection of clipped peaks. The ideal setting is a level just below the actual level of clipping, you can examine the waveform in the main Edison window andinspect the clip level by hovering the mouse over the clipped waveform.
NOTE: The Declipper re-creates peaks above the clipped level and will therefore reduce the overall volume of the recording to provide headroom for this process. In light of this, declipping usually needs to be applied to the entirerecording in order to avoid a sudden drop in volume in the processed region.
Declicker
To activate ensure the Declicker button is selected. The Declicker is useful for restoring for old vinyl and other recordings that cause clicks, pops and/or crackles. The Declicker can also remove a varietyof short noises from other sources, including lip clicks and 'smacking' on vocals, some clicks caused by digital errors or electrical interference. The Declicker works best onclick-transients of 10 ms or less.
- Sensitivity - Controls the aggressiveness of the click detection algorithm. Low values of this parameter will remove fewer clicks, while higher values may treat musical transients as clicks, resulting in distortion.
Accept button
- Accept - Processes and pastes (replaces) the original selection.
Interface: Didier Dambrin.